
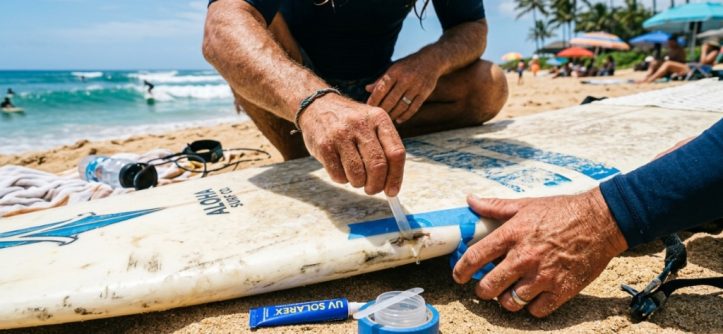
Living in Hawaii means your surfboard takes a beating. Between shallow reef passes, lava rock entries, and the constant UV exposure from the tropical sun, dings and cracks are not a matter of if—they are a matter of when. If you are reading this, you have likely already realized that paying a shop for every minor ding is expensive and inconvenient. The real solution is having a reliable repair kit on hand. But not all kits are created equal, especially when you are dealing with the unique conditions of the Hawaiian Islands. This guide breaks down exactly what you need to look for, what materials actually matter, and how to avoid wasting money on a kit that will fail under pressure. We will help you identify the best surfboard repair kit Hawaii conditions demand, ensuring you get back in the water quickly and safely.
Why Hawaii Requires a Specific Type of Repair Kit
The standard mainland repair kit often falls short in the Pacific. The primary issue is temperature and humidity. Most polyester resins and even some epoxies cure slower in humid, warm environments, or they can become brittle if they cure too fast in direct sunlight. Furthermore, the water temperature in Hawaii is consistently warm (averaging 75–80°F), which means the repair needs to be fully cured and watertight before you paddle out. A rushed repair will fail within a week. You need a kit that offers a fast cure time but also remains flexible enough to withstand the constant flexing of a board in warm water.
The UV Factor
Hawaii sits closer to the equator than most surf destinations, meaning UV radiation is intense. Sun damage degrades the resin over time, causing yellowing and brittleness. A quality kit for Hawaii should include a UV-resistant topcoat or a resin that is specifically formulated to resist solar degradation. If you buy a cheap kit with basic resin, the repair area will chalk up and weaken within a few months, leading to a secondary failure right where you fixed it.
Essential Components of a Complete Kit
Before you buy, you need to understand what separates a “ding patch” kit from a true repair system. Many kits sold in tourist shops are just a small tube of resin and a piece of cloth. That is insufficient for reef rash or rail cracks. A proper kit should include several critical components that allow you to perform a structural repair, not just a cosmetic fill.
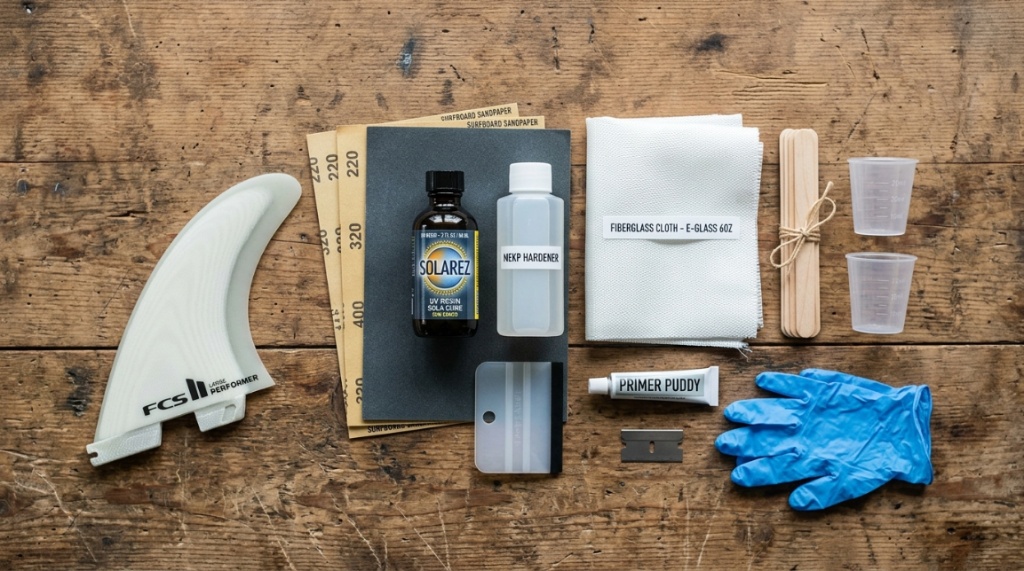
- Resin and Hardener: Look for a 2:1 or 1:1 ratio system that is easy to measure. Epoxy is generally preferred for modern boards, but you need to know what your board is made of.
- Fiberglass Cloth: The kit must include woven fiberglass cloth (not just a sticker). You need at least a 4″ x 4″ piece for small dings, but larger patches are better for rail damage.
- UV-Resistant Topcoat: This is non-negotiable for Hawaii. It seals the repair and prevents sun damage.
- Sanding Materials: You need coarse grit (80) for shaping and fine grit (220) for finishing. Some kits include a sanding block, which is helpful but not essential.
- Mixing Cups and Stir Sticks: Accurate mixing is vital. If the kit uses a “squeeze tube” system, ensure it has a metered pump or clear measurement lines.
- Gloves and Safety Gear: Resin is toxic. A good kit includes nitrile gloves, not just latex.
Epoxy vs. Polyester: Which Base Resin?
This is the most critical decision. If you have a PU (polyurethane) board, you can use either epoxy or polyester resin, but epoxy is safer and adheres better. If you have an EPS (expanded polystyrene) board, you must use epoxy resin. Polyester resin will literally melt EPS foam, turning your board into a pile of goo. Check the stringer or the fin box to identify your board type. If you are unsure, epoxy is the safer bet for most modern boards, but it is more expensive and takes slightly longer to sand.
Key Features to Look For in a Hawaii-Ready Kit
Not all kits are created equal regarding the specific stresses of Hawaiian surf. You need to prioritize features that address heat, humidity, and frequent use.
Fast Cure Time
In Hawaii, you often surf multiple times a day. A resin that takes 24 hours to cure is a liability. Look for a system that cures in 15–20 minutes for the initial set, allowing you to sand and apply a hot coat within an hour. However, be careful: “fast cure” often means “short working time.” You need a resin that gives you at least 5–7 minutes of working time to mix and apply properly before it kicks off.
Temperature Resistance
The resin will cure in warm air temperatures (often 85°F+). Some resins are formulated for cooler climates and will cure too quickly in Hawaii, creating air bubbles and a weak, brittle patch. Look for a resin with a “pot life” that is rated for tropical conditions. This information is usually listed in the technical specs on the packaging or the manufacturer’s website.
Flexibility
Surfboards flex, especially in hollow waves. A rigid, brittle repair will crack on the first hard bottom turn. A good repair kit uses a resin that retains a slight degree of flexibility after curing. This prevents the patch from delaminating from the board when the board bends. This is particularly important for rail repairs, which endure the most stress.
Step-by-Step Guide to a Proper Repair
Having the right kit is only half the battle. You need to know how to use it correctly. Here is a simplified but accurate process for fixing a standard ding.
- Prep the Area: Remove any loose fiberglass and wax. Use a razor blade to cut away damaged cloth. Sand the area with 80-grit sandpaper to create a “tooth” for the resin to adhere to. Wipe clean with a solvent (acetone or rubbing alcohol) to remove dust and salt.
- Mix the Resin: Follow the exact ratio on the kit. Mix thoroughly for at least 2 minutes, scraping the sides and bottom of the cup. Inconsistent mixing is the #1 cause of sticky or weak repairs.
- Wet Out the Cloth: Cut your fiberglass cloth slightly larger than the ding. Lay it over the hole and apply the resin with a brush or a gloved finger. Saturate the cloth completely until it becomes transparent. Remove any air bubbles by stippling with the brush.
- Let It Cure: Allow the resin to cure completely. Do not touch it to test it. Wait until it is hard to the touch and does not dent with a fingernail.
- Sand and Finish: Sand the patch down flush with the board using 80-grit, then smooth with 220-grit. Apply a final thin “hot coat” of resin to seal the weave of the cloth. Let it cure, then sand smooth with 400-grit for a glossy finish.
Common Mistakes to Avoid
Many surfers ruin a good repair by rushing. The most common mistake is applying the cloth dry and then trying to soak it with resin on the board. This traps air bubbles, creating a weak spot. Another mistake is using too much hardener to speed up the cure. This makes the resin brittle and prone to cracking. Always measure precisely. Finally, do not repair a wet board. If water is trapped inside the foam, it will turn to steam in the sun and blow the patch out. Dry the board in the sun for a day before repairing.
Comparing Kit Types: All-in-One vs. Custom Build
You generally have two options when purchasing a repair system: a pre-packaged all-in-one kit or a custom selection of individual materials. Each has its place in Hawaii.
| Feature | All-in-One Kit | Custom Build |
|---|---|---|
| Convenience | High – everything is included | Low – requires separate purchases |
| Cost | Moderate – good value for beginners | Higher upfront, but cheaper per repair in bulk |
| Quality | Variable – often includes lower-grade tools | High – you choose professional-grade materials |
| Best For | Travelers, beginners, and emergency fixes | Local surfers who repair boards regularly |
| UV Protection | Often included, but check the label | You can specifically buy high-end UV resin |
If you are a visitor staying for two weeks, an all-in-one kit is perfect. If you live on the North Shore or in town and surf daily, you will save money and get better results by buying a quart of epoxy resin, a roll of fiberglass cloth, and a separate UV topcoat. This allows you to mix only what you need, preventing waste,To keep your board secure in heavy Hawaiian shore breaks, make sure you pair your freshly repaired board with a Durable Surfboard Leash That Lasts Longer.
Where to Buy and What to Avoid
You can find repair kits at local surf shops, hardware stores, and online. However, avoid the “sun-cure” patch stickers sold at beach stands. These are temporary fixes at best. They do not provide structural strength and will peel off in a day. For a permanent repair, you need a two-part resin system.
When shopping locally, ask the shop owner what they use for their repairs. Local shapers often sell their own resin blends, which are specifically formulated for Hawaiian conditions. These are usually superior to generic hardware store epoxy. If you are buying online, check the shipping time—resin can be heat-sensitive during transit, and you want a fresh batch, not one that has been sitting in a hot warehouse for months.
Maintaining Your Repair
Once you have fixed the ding, you need to maintain the patch. In Hawaii, the sun is your enemy. Keep your board in a board bag or out of direct sunlight when not in use. UV rays will degrade the resin over time, even with a UV topcoat. If you notice the patch starting to yellow or chalk, apply a fresh coat of UV resin to extend its life. This is a simple maintenance step that takes five minutes and prevents water from seeping into the repair.
Frequently Asked Questions
Can I use a regular epoxy kit on a soft-top board?
No. Soft-top boards are made of a different foam that reacts poorly to standard epoxy resins. You need a specialized flexible adhesive or a kit specifically designed for soft-top construction. Using a standard kit will make the foam brittle and cause the skin to separate.
How long does a repair take before I can surf?
It depends on the resin. Most epoxies are sandable in 1–2 hours and fully cured in 24 hours. However, for a structural repair, you should wait the full 24 hours. Surfing too early can cause the patch to flex before it reaches full strength, leading to failure.
Is it cheaper to repair my board myself or take it to a shop?
For a single ding, a shop is often cheaper if you have no materials. However, a $40 kit can fix 10–15 dings, making it significantly cheaper in the long run. If you surf frequently in Hawaii, the kit pays for itself within a month.
What if the ding is on the rail?
Rail dings are structural. You need to apply multiple layers of fiberglass cloth to rebuild the edge. A single layer will not be strong enough. Use a thicker cloth or double up the layers, and be prepared to sand more to shape the rail back to its original contour.
Can I repair a snapped board with a kit?
No. A snapped board requires a professional repair with a stringer re-alignment. A kit is only for dings, cracks, and delamination. Attempting to fix a snap with a kit will result in a weak board that breaks again immediately.
Conclusion
Choosing the right repair kit for Hawaii comes down to understanding the environment. You need a kit that offers UV protection, a fast cure time suitable for warm climates, and the flexibility to withstand the stress of powerful waves. Avoid cheap sticker patches and generic hardware store resins. Invest in a quality epoxy system that includes fiberglass cloth and a UV topcoat. Whether you choose an all-in-one kit for convenience or build a custom setup for serious maintenance, the ability to fix your own board is an essential skill for any surfer living in or visiting the islands. Take the time to do the repair correctly, let it cure fully, and you will extend the life of your board significantly, saving you money and keeping you in the water longer.



Leave a Reply