
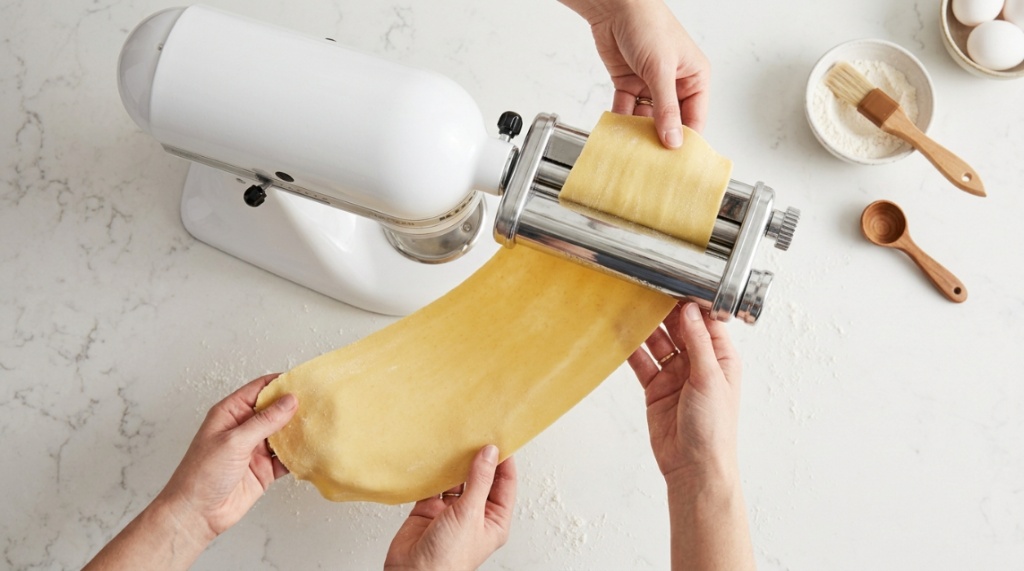
Few things are as frustrating as rolling out fresh pasta dough, only to have it bunch up, tear, or clog the rollers of your KitchenAid pasta attachment. This common issue turns an exciting cooking project into a sticky mess. The good news is that jams are rarely a sign of a defective tool; they are almost always a symptom of technique, dough preparation, or maintenance oversights. Understanding the root causes—from hydration levels to cleaning habits—is the first step toward a smooth, consistent pasta-making experience. This guide offers a definitive KitchenAid pasta attachment jams fix strategy, blending expert insight with practical steps to keep your pasta night stress-free.
Why Does My KitchenAid Pasta Roller Keep Jamming?
A jam typically occurs when dough sticks to the rollers or when the dough sheet is too thick or too wet to pass through the gap. The most common culprits are insufficient kneading, excessive moisture, and skipping the crucial “dusting” step. When dough enters the rollers at an angle, it also creates uneven pressure, causing it to fold over itself. Understanding these triggers is the foundation of prevention.
The Hydration Dilemma: Too Much Water, Too Much Stick
Standard pasta dough requires a hydration level of about 25% to 30% (water weight relative to flour). If your dough feels tacky or leaves residue on your fingers, it is too wet. When hydrations are too high, the dough adheres to the steel rollers instead of passing through smoothly. The fix is simple: add flour incrementally until the dough feels smooth and slightly firm, like soft clay.
Angle of Entry: The Hidden Mistake
Many users feed the dough slab into the rollers perpendicular (straight on). This creates a high-pressure point at the center. Instead, feed the dough at a slight downward angle, holding the edge with both hands and letting the rollers “grab” the dough naturally. This reduces stress on the motor and prevents the dough from folding back over the top roller, which is a primary cause of jams.
Dough Temperature and Elasticity
Overly cold dough is stiff and resistant, causing the motor to strain and the dough to crack. Conversely, overly warm dough becomes sticky and soft. The ideal dough temperature is around 70°F to 75°F (21°C to 24°C). If your kitchen is hot, refrigerate the dough for 15 minutes before rolling. If it is cold, let it rest at room temperature for 10 minutes.
What is the Correct Technique for Feeding Dough?
Correct feeding technique involves three key steps: flattening the dough by hand, dusting with flour, and using a steady, moderate speed. Never force the dough; let the machine pull it through. If it stalls, decrease the roller width and try again. The attachment is a tool, not a press—it needs your assistance to shape, not push.
Hand Flattening: The Pre-Roll Ritual
Before you ever turn on the mixer, press the dough into a disc about ½ inch thick. A thick, uneven chunk of dough has to deform too much at once, leading to tearing and jamming. A pre-flattened sheet enters the roller gap with uniform resistance, reducing the likelihood of a fold-over. Use a rolling pin on a lightly floured surface if necessary.
The “Flour Dusting” Rule: When and How Much
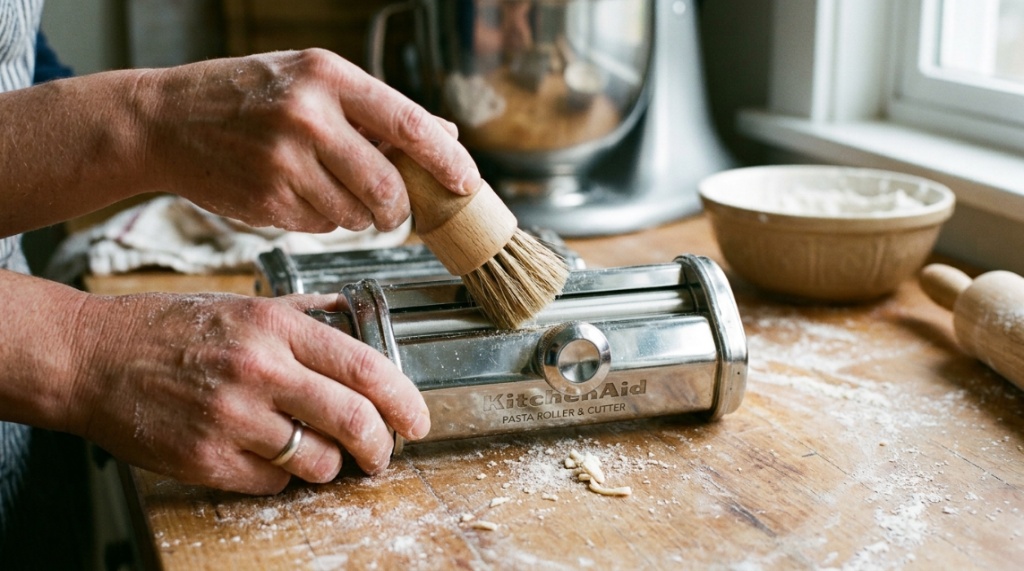
Dust the dough sheet lightly with all-purpose flour or semolina before every pass. Use a small dry pastry brush to brush off excess flour after each pass—too much flour makes dry, brittle pasta. The goal is a matte finish, not a white coating. This thin layer of flour acts as a dry lubricant between the dough and the steel roller.
Speed Settings: Why Low and Slow Wins
Always use the lowest speed setting (typically speed 2 on KitchenAid). High speeds generate heat through friction, which melts the butter or eggs in the dough, making it sticky. Slow speed gives you better control and allows the dough to move through the rollers uniformly, dramatically reducing the risk of jams.
How to Fix a Stubborn Pasta Dough Jam Mid-Roll
If you feel resistance and see the dough bunching up, immediately stop the mixer and disengage the attachment. Do not run the machine in reverse. Instead, gently pull the dough back out. If it has torn inside the rollers, you will need to remove the attachment and clean it thoroughly. Trying to force it will damage the rollers.
Step-by-Step Unjamming Process
- Power Off: Turn off the mixer and unplug the hub cover.
- Reverse Feed: Manually turn the roller crank (if available) or gently guide the dough out from the top.
- Remove & Clean: If sticky residue remains, detach the roller and rinse under warm water. Use a wooden skewer or toothpick to dislodge dough from the grooves. Avoid using metal tools that scratch the rollers.
- Dry Completely: Dry the attachment thoroughly with a lint-free cloth before reattaching.
- Adjust Dough: Knead the removed dough back into the ball, adding flour to stiffen it, and start again with a wider setting (for example, setting 1).
When to Restart vs. When to Discard
If the dough is just slightly wrinkled, you can re-knead it and start over. However, if the dough has gathered too much flour or has become dry and cracked, discard it and make a new batch. Dough that has been heavily handled becomes tough and will likely jam again.
Cleaning the Rollers After a Jam
Do not wash the pasta attachment in the dishwasher or soak it in water. This rusts the internal gears. Clean with a soft brush and dry cloth. For tough residue, run a piece of dry pasta dough (or a ball of flour and water) through the rollers to absorb the sticky bits. This is a professional trick to keep the rollers pristine.
Which Dough Recipes Are Least Likely to Jam?
Recipes that use all-purpose flour (rather than ’00’ flour) and a higher proportion of egg yolks tend to be more forgiving. These doughs have more structure and less stickiness. Conversely, fresh spinach or tomato pasta (with added vegetable puree) has higher moisture content, making them prone to jamming. Knowing which recipes to attempt first reduces frustration.
Comparing Flour Types for Roller Performance
| Flour Type | Stickiness Level | Best Use |
|---|---|---|
| All-Purpose (AP) | Medium | Easiest for beginners |
| Semolina | Low | Holds up well, gritty texture |
| ‘00’ Flour | High | Smooth but needs precise hydration |
| Whole Wheat | Low | Drier, requires more moisture |
If you are using a high-stickiness flour, increase the resting time and use more dusting flour. Semolina mixed with AP flour (50/50) provides a non-stick surface that rolls beautifully without extra flour.
Eggless vs. Egg-Based Dough
Eggless dough (water-based) is firmer and less sticky, making it ideal for those new to attachments. Egg-based dough is richer and more elastic but can be tacky if under-kneaded. If you prefer egg pasta, add an extra yolk and reduce the water slightly. The yolk acts as an emulsifier, producing a smoother sheet.
The Resting Period: Non-Negotiable for Success
Resting dough for at least 30 minutes (covered) allows the gluten to relax. Gluten that is too tense resists rolling, causing the dough to snap back and jam. A rested dough is pliable and stretches easily. For a thorough KitchenAid pasta attachment jams fix, mark the resting time on a timer—it’s a crucial, often skipped step.
How to Properly Clean and Store Pasta Attachments
Proper maintenance is as critical as technique. A dirty roller or a lubricated gear that has collected flour dust will eventually seize up. After every use, remove the attachment and brush off all flour. Store it in a dry, cool place. Do not leave it attached to the mixer, as constant pressure can warp the plastic gears.
Daily Cleaning Routine
- Brush: Use the included cleaning brush to sweep flour from rollers.
- Pin/Peg: Clean the pegs and the hub connection point.
- Air Dry: Let it air dry completely before storing.
Monthly Maintenance
Once a month, lightly lubricate the gears with food-grade mineral oil (not cooking oil). Put a drop on the gear teeth and run the attachment for 30 seconds to distribute. This is an often overlooked KitchenAid pasta attachment jams fix for issues arising from grinding gears.
Signs Your Attachment Needs Inspection
If you hear a clicking sound or feel a rough vibration, the gears might be off-track or have dried grease. Discontinue use immediately and take the attachment apart to inspect for debris. Sometimes, a tiny piece of dried dough can get lodged near the gear, causing a jam that seems like a mechanical failure.
Can You Use the Pasta Attachment for Fettuccine Without Jamming?
Yes, but only if the rolled sheet is the correct thickness and has been dusted. Fettuccine (and spaghetti) cutters jam when the sheet is too thick (should be at setting 5 or 6 depending on your model) or when the sheet is not floured. If the sheet is even slightly tacky, the noodles will clump together and block the cutter teeth.
Technique for Cutter Attachments
Run the sheet through the cutter at a slow, steady pace. Use one hand to feed the sheet and the other to gently catch the noodles as they emerge. Do not pull the noodles; let them fall naturally. If they bunch up at the exit, stop and clean the cutter with a toothpick.
The Flour Factor for Cutters
After rolling the sheet, dust both sides with semolina before feeding through the cutter. Semolina doesn’t absorb into the dough as quickly as AP flour, leaving a gritty barrier that prevents sticking. Shake off excess flour in a colander before cooking.
Cleaning the Cutter Immediately
Do not wait until after dinner to clean the cutters. Dough dries like cement. Immediately after cutting, use the brush and a toothpick to remove all dough remnants. Rinse under hot water and dry with a hairdryer (cool setting) if you want to be thorough.
Is My KitchenAid Mixer Too Weak for Pasta?
No, a standard 250-watt KitchenAid has ample power for pasta rolling. However, if the motor appears to struggle, it is usually because the dough is too stiff or the gap is too narrow. Never push the mixer past speed 2. A poorly maintained attachment or overly dry dough can put excessive strain, causing the mixer to overheat and cut off.
Recognizing Motor Strain Symptoms
If the mixer makes a clicking sound (thermal overload) or slows down significantly, you have created too much resistance. Turn it off, make the dough more pliable (add a few drops of water) and widen the roller gap to setting 1 before re-rolling. It is never the mixer’s fault; it is always the dough’s thickness or dryness.
Upgrading vs. Troubleshooting
Before purchasing a new attachment, revisit your dough hydration and resting times. Over 90% of “broken” attachments are actually just gummed up with old dough. A full disassembly and cleaning usually restores performance. If your attachment is over five years old and you’ve rolled hundreds of pounds of pasta, consider replacing the gears but not the whole unit—kit parts are often sold separately.
A Budget-Friendly Insurance Policy
If you’re frequently battling jams with your current setup, it might be worth checking out reliable alternatives. For those who want a backup or a model with a different gear ratio, our guide on the KitchenAid pasta attachment jams fix includes practical comparisons and recommendations that can save you both time and money in the long run.
How Does Dough Thickness Affect Jamming Frequency?
Dough thickness directly controls the amount of force required to push the dough through. The narrower the setting, the more stress is placed on the dough and the rollers. If you skip settings (e.g., going from 3 to 1 directly), you double the risk of a jam. Always reduce the thickness gradually by one full number at a time.
The Gradual Reduction Rule
- Start at setting 1 (widest) to create a base sheet.
- Fold the sheet in thirds and run through setting 1 again to create structure.
- Move to setting 2, then 3, then 4, etc.
If you need pasta at setting 5, pass through settings 1,2,3,4 first. This gradual process aligns the gluten and prevents overstretching, which is the primary reason dough tears and wraps around the roller.
Signs of Correct Thickness
You should be able to see your hand faintly through a correctly rolled sheet (for lasagna) or feel slight texture for fettuccine. If the sheet becomes transparent or tears easily, you’ve gone too thin. If it springs back, it’s too thick. Adjust your flour add-ins accordingly.
When to Stop Rolling
For most shapes, setting 5 or 6 on a consumer attachment is the sweet spot. Going to setting 7 (very thin) requires a delicate dough with zero moisture. If your kitchen is humid, stop at 5 to avoid a sticky, tear-prone sheet.
What Are the Best Practices for Drying Pasta to Prevent Sticking?
After cutting, the pasta must be dusted immediately. Fresh pasta left to sit will stick to itself if not coated. Lay the noodles in a single layer on a parchment-lined tray, sprinkling with semolina. Let them dry for 30 minutes before cooking. This prevents the strands from fusing together during boiling.
Air Drying vs. Flash Freezing
If you are not cooking immediately, freeze the pasta in a single layer for 30 minutes, then transfer to a freezer bag. This avoids jamming in the storage container and maintains shape. For drying, hang them on a pasta drying rack—never over a chair, as dust collects,Once your pasta is successfully cut without jamming, the next crucial step is managing your workspace. Check out our guide on how to dry pasta efficiently in small NC kitchens to prevent overcrowding while your fresh batches dry.
Humidity and Its Sneaky Effects
On a rainy day, increase your flour by 10%. The moisture in the air absorbs into the dough, making it tackier and more prone to jamming. In dry climates, you might need a few extra drops of water. Awareness of your environment produces consistent results.
Testing for Doneness (Taste Test)
Boil a small piece of the dried pasta to test its texture. If it sticks to your teeth or disintegrates, it was too wet when rolled. If it tastes floury, give it more rest time before cooking. Keeping a log of the perfect hydration ratio for your kitchen is a pro-level tip.
Frequently Asked Questions
Can I use olive oil in the dough to prevent jams?
Yes, a teaspoon of olive oil can help. It lubricates the dough slightly and adds elasticity. However, too much oil makes the dough crumbly and will cause dry spots. Use less than a tablespoon for two cups of flour. Oil does not replace the need for dusting flour.
Why does my dough keep tearing even when it doesn’t jam?
Tearing occurs when the gap is too small for the dough’s hydration level. If the dough tears, increase the gap one setting, or knead in a little more flour to strengthen the gluten. Also, check that your rollers are properly aligned; a loose clamp can cause uneven tension.
How often should I sharpen the cutters on my pasta attachment?
Home users rarely need to sharpen cutters. However, if you see rough, torn edges on noodles, the teeth may be clogged or dull. Clean them meticulously with a toothpick. Never use sandpaper or wire, which ruins the steel. If the cutter is damaged, replacement parts are inexpensive.
Is it safe to run the pasta attachment at speed 4 for better results?
No. Always use speed 2. Higher speeds create heat and force that stretches the dough unevenly, directly causing jams. The motor of the mixer is not designed for high torque in this gear. Speed 2 is engineered for gear durability.
Do I need to disassemble the attachment for cleaning after every use?
No, but you must brush out the flour. Disassemble only for deep cleaning (monthly or after a major jam). Frequent disassembly can strip the screws. Wipe the exterior with a dry cloth, and use the brush for the interior channels.
Conclusion
Avoiding pasta attachment jams is entirely within your control. It boils down to respecting the dough’s hydration, rolling gradually through settings, and maintaining your equipment meticulously. By following the techniques outlined here—from pre-flattening and dusting to regular gear lubrication—you eliminate the root causes of these frustrating interruptions. Remember, a jammed roller is just a signal to adjust your approach, not a reason to give up. With practice, you’ll pull long, silky sheets of pasta without a second thought.
Now, go grab that flour and put these strategies to work. Your kitchen should be a place of pleasure, not processor problems. For those keen to explore even better performance and durability in their pasta-making toolkit, consider checking out our other comparative resources. The solution to smooth rolling is just one well-prepared dough away.


Leave a Reply